


How to Safely Open a Sealed Cremation Urn
Why Sealed Urns Exist—and What’s Really Inside
“This is the Funeral.com podcast — real conversations about loss, remembrance, and planning with purpose. Because every life deserves to be honored in a meaningful way.”
Have you ever stared at a sealed cremation urn and wondered—not just what’s inside, but how on earth it’s actually closed? Let me tell you, you’re not alone. The rise of cremation in the U.S.—now over 60% of families choose it—means more people than ever are left holding urns, and sometimes, questions. Why are urns sealed in the first place? It’s not about secrecy. It’s protection: to keep ashes safe from accidental spills, transport jostles, or curious little hands. For many, a sealed urn symbolizes emotional closure—a ‘finished’ memorial, safe and settled.
But here’s the twist: most urns aren’t sealed forever in the way a time capsule might be. Terms like 'permanently sealed' often mean ‘not meant for home reopening,’ not ‘impossible to open.’ That distinction matters, because while adhesives and set screws create a strong seal, funeral homes can usually open and reclose urns safely if you need it.
Now you might be thinking—'If most urns CAN be opened, why does it feel so intimidating?' It’s the fear of doing something wrong—spilling ashes or damaging a precious memorial. That fear is valid. In fact, that’s why we need to demystify what’s really going on with urn closures.
The two terms to keep in mind? Closure mechanism and sealing adhesive. Think of a closure mechanism like the childproof top on a medicine bottle: it’s designed to prevent accidents. Sealing adhesives, like those used on envelopes or packaging, keep everything airtight and tamper-evident.
So, before you even consider opening an urn, remember: the seal is for safety and respect, not to keep you out forever. Next, let’s talk about how to identify what kind of seal you’re actually dealing with.
How to Identify Your Urn’s Closure—No Guesswork Required
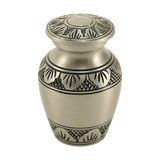
Imagine you’re handed an urn—maybe after a service, or perhaps it’s been on your shelf for months. How do you know what’s keeping it closed? Here’s where a little detective work pays off. The first step: slow inspection in good light. Look for a visible seam at the top—this often means a threaded lid, the urn world’s version of a screw-top jar.
Feel around the rim for a groove. That groove can signal hidden threads, a tiny detail with big consequences for safe opening. Next, check for the elusive set screw—a tiny fastener, usually along the rim, that keeps the lid locked tight. It’s the urn equivalent of a bike lock: small but mighty, and often overlooked.
Don’t forget the base. Flip the urn gently; some have felt pads or screws underneath, which hide a removable bottom panel. If you spot dried glue or a tacky edge—congratulations, you’ve found evidence of sealing adhesive. Sealing adhesive acts like super-strong double-sided tape: invisible, secure, but risky to remove at home.
Now you might be wondering—'Do I really need a toolkit just to check?' Not always! The easiest tool is the urn’s paperwork or product listing. Manufacturers often spell out the closure type, saving you a world of stress.
Here’s the bottom line: Never force movement if you’re unsure. Identifying the closure is about prevention, not bravado. And it’s the surest way to avoid the heartbreak of accidental spills or irreversible damage. Ready to check the seal without actually opening it? Let’s cover that next.
Safe Techniques for Checking and Opening Urn Seals
Let’s say you just want reassurance—no drama, no dust, just confidence the urn is secure. Here’s how: Place the urn over a soft, folded towel and gently try to rotate the lid. If it moves with little effort, chances are it’s a threaded lid. If it doesn’t budge, it might be locked with a set screw or sealed with adhesive.
Look closely for gaps: a properly threaded lid sits flush, while an adhesive seal might show a faint glue line. Hear a shifting sound inside as you tip the urn? Don’t panic! Most ashes are inside a sealed bag. But if the actual lid rattles, stop—this could mean the seal is loose.
For screw-top urns, think grip, not muscle. A rubber jar-grip pad or nitrile gloves improve traction without risking a slip. If you must use a tool, a strap wrench is your friend—but only with caution, especially on metal. Picture it as using a seatbelt to open a stuck jar, not a crowbar.
When encountering a set screw, use the right-sized Allen key—think precision screwdriver, not hardware store brawn. For glued lids, switch to a detective’s mindset: less force, more information. Reach out to the funeral home or urn provider to ask about the kind of adhesive used before doing anything irreversible.
Now, you might be tempted: 'Should I pry, heat, or use solvents?' My advice? Don’t. Different urn materials—metal, ceramic, glass—react unpredictably to force or chemicals. The risk of cosmetic or structural damage skyrockets. If gentle, informed effort isn’t working, that’s your cue to call a professional. No shame; just smart, respectful handling.
Urn Materials and Why They Affect Your Next Steps
Let me share a story: a family tried to open a glazed ceramic urn with a butter knife. The closure was adhesive, the edge was brittle, and the result was a chipped rim and a lot of regrets. What went wrong? In a word, material. Metal, ceramic, and glass urns all need different handling strategies.
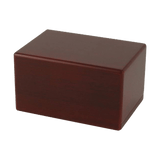
Metal urns are generally the most forgiving; they can handle careful tool use—like a strap wrench—because metal distributes pressure evenly. But even metal dents or scratches, which can ruin an engraved finish. Ceramic urns, on the other hand, are strong but brittle. The rim—the area where force is most tempting—chips easily and is hard to repair.
Glass urns are the most delicate of all. Just a little twisting torque or rapid temperature change can create stress fractures. Imagine opening a stuck pickle jar—but what if the glass could shatter from a gentle twist? That’s the risk you’re managing.
Here’s some technical lingo for you: thermal stress and mechanical leverage. Thermal stress means heat can make different parts of the urn expand at different rates, causing cracks. Mechanical leverage is when a small force at the right angle creates big movement—sometimes too much for fragile materials.
So, next time you’re tempted to DIY open a sealed urn, pause and ask: 'Is this material asking for gentle hands or a professional’s touch?' It’s always better to adjust your approach, not the urn’s integrity. Now, what if your goal isn’t to open the main urn, but just a keepsake or jewelry piece? Let’s tackle that.
Keepsake Urns and Memorial Jewelry: Small Openings, Big Emotions
Now let’s talk about the little things—literally. Keepsake urns and cremation jewelry are designed to hold just a portion of ashes, making sharing among family or creating a wearable memorial possible. But these tiny containers come with their own challenges.
Have you ever tried to open a keepsake urn and felt it wouldn’t budge? That’s because the threading—much like a fine watch crown—is delicate, and people often overtighten out of fear of spills. The technical term here is micro-threading: super-fine screw threads that keep a tight seal but can strip or jam if forced.
Cremation jewelry, like necklaces or bracelets, often use tiny compartments sealed with a minuscule screw. Here’s where it’s easy to slip from gentle memorial into frustrating fiddling—especially without the right tools. If you find yourself turning and nothing’s happening, stop. The risk of stripping the screw or damaging the pendant is real.
Now you might wonder, 'Can I do this myself or should I ask a jeweler?' If the piece is valuable or sentimentally irreplaceable, err on the side of caution. Jewelers and memorial providers have the precision tools and experience to open, fill, and reclose these pieces without harm.
So whether you’re dividing ashes between siblings or preparing a necklace to wear close to your heart, treat keepsake urns and jewelry like heirlooms, not hardware. Gentle hands, patience, and the right advice make all the difference.
Knowing When to Ask for Help—and What Happens Next
Let’s be honest: Sometimes the bravest thing you can do is stop and seek help. Are you facing a lid that won’t move, evidence of strong adhesive, or a surface starting to crack? That’s your signal. It’s not about admitting defeat—it’s about respecting both the urn and your loved one’s memory.
Funeral homes see these situations all the time. They have the specialized tools and know-how to open, divide, or reseal urns without risk. They’ll identify the closure type, use gentle grip aids, and even reseal the urn after if needed. Jewelers who specialize in memorial jewelry offer a similar service for keepsake pieces and necklaces.
Now, you might be thinking, 'But isn’t this something I should handle myself?' Sometimes yes, but sometimes the most respectful thing is to let a professional guide the process. After all, we’re talking about items that hold irreplaceable meaning. Here’s another technical term: risk threshold. That’s the balance point where the chance of damage outweighs the benefit of DIY. If you need the urn to remain display-perfect, or you’re unsure of the closure, the risk threshold for home attempts drops sharply.
At the end of the day, permission matters. It’s okay to want reassurance, access, or even just a second opinion. Your loved one’s memory deserves care—and so do you. If you need help, ask. It’s the safest and most respectful route for everyone involved.
“Thanks for listening. Visit Funeral.com for memorial resources and thoughtful keepsakes, and follow us for more episodes. We’re grateful you’re part of this community.”
Read the full article here: Can You Open a Sealed Cremation Urn? Safe Ways to Check the Seal and What to Do If It’s Glued


