


The day a memorial package shows up on your doorstep can feel strangely ordinary and strangely heavy at the same time. It might look like any other delivery—tape, cardboard, packing paper—yet you know what it represents: a decision you made while grieving, planning, or trying to steady your family through the practical details. If you ordered cremation urns online, a quick, calm inspection protects you in two ways. First, it helps you catch shipping issues while they’re still easy to document. Second, it lets you confirm the urn is truly ready—physically and functionally—before you ever place ashes inside.
This guide is a simple, low-stress approach to inspect urn on arrival—especially when the urn is ceramic, glass, engraved, or has hardware like a bottom plate, screws, or a gasket. Think of it as a small act of care for your future self. You do it once, you do it gently, and then you can move forward with more confidence.
Why this matters more now than it used to
More families are navigating cremation decisions than at any point in modern U.S. history, which means more families are choosing urns and keepsakes that ship directly to their homes. In 2025, the National Funeral Directors Association reported a U.S. cremation rate of 63.4% for 2025, with projections rising over time. The Cremation Association of North America also reports that in 2024 the U.S. cremation rate was 61.8%. When cremation becomes the default for many families, the “aftercare” decisions—like selecting an urn, ordering cremation jewelry, or planning scattering—become a normal part of modern funeral planning, not a niche path.
That shift is one reason it’s worth treating your urn like both a memorial and a product that deserves a proper arrival check. The goal is not to be suspicious or picky. The goal is to avoid the heartbreak of discovering a hairline crack or a mismatched engraving after you’ve already discarded packaging and moved on mentally.
Before you discard packaging, create a calm inspection moment
If you’re reading this because you want a true cremation urn inspection checklist, start here: do not rush. Most avoidable problems happen in the first ten minutes—when someone is eager to “get it done,” throws away padding, and later realizes there’s a dent, chip, or missing hardware. Give yourself a quiet surface, good light, and a clear “no interruptions” window. If you can, keep pets and kids out of the room. Not because anything is dangerous, but because you want steady hands and your full attention.
It also helps to set an intention: you are not opening this box to prove anything. You are opening it to learn what you have, confirm it matches what you ordered, and document condition in case you need support. That simple mindset takes the edge off.
What to photograph for shipping and return protection
The fastest way to protect yourself—especially if you later need shipping damage urn photos or decide to reference an urn return policy—is to photograph in a logical sequence. These images are not “dramatic.” They’re just clear and time-stamped.
- Exterior of the box from multiple angles, including any dents, punctures, crushed corners, or water marks.
- Shipping label (so the carrier and tracking number are visible).
- How the urn was packed before you move anything (foam inserts, paper, air pillows, molded supports).
- The urn in the packaging, before lifting it out.
- Close-ups of any damage you see, plus one wider photo showing where that damage is on the urn.
- Any included accessories or hardware (screws, felt base, gasket, adhesive, engraving paperwork, or a filling kit).
These are the practical basics that make a “he said, she said” shipping conversation turn into a straightforward record. If you later need to file shipping claim urn documentation, this set of photos usually covers what support teams request.
Start with “obvious” inspection: surface, shape, stability
Once the urn is out of the box, begin with what your eyes and hands can confirm in seconds: does it look like what you ordered, and does it sit correctly? You’re not looking for perfection in handcrafted pieces; you’re looking for cracks, chips, dents, loose parts, or finish problems that signal damage in transit.
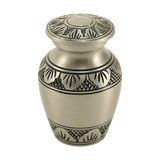
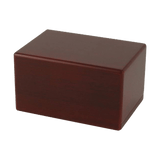
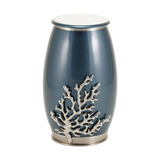
If the urn is ceramic, glass, or stone, take your time. A small fracture can be easy to miss until it catches the light at the right angle. Rotate the urn slowly under a lamp or window, then run a fingertip gently along edges and seams. If something feels sharp where it should be smooth, pause and look again. With metal urns, check for dents near the lid seam and base edge, because impact there can affect how the closure fits. With wood urns, check corners, joints, and any veneer transitions for separation that might have occurred if the box experienced moisture or compression.
One quick but meaningful test is stability: place the urn on a flat surface and gently tap the tabletop near it. A well-built urn should feel solid and “quiet.” A wobble can indicate an uneven base, a bent bottom plate, or a foot that shifted. Stability matters whether you’re choosing full-size cremation urns for ashes or small cremation urns meant for a shelf that gets daily traffic.
If you’re still browsing options—or you’re choosing a backup or replacement—start with Funeral.com’s cremation urns for ashes collection for full-size designs, or the small cremation urns for ashes collection if you’re planning a shared arrangement or need something more compact.
Then do the “functional” checks that matter most
A memorial urn is not just a display piece. It has one job that matters more than aesthetics: it must close securely and remain secure. This is where many families benefit from a short, practical cremation urn inspection checklist mindset. You do not have to open the urn fully if you are not emotionally ready, but you should confirm that the closure system behaves the way it’s supposed to. The best time to find a cross-threaded lid or a stripped screw is before ashes are involved.
Check lid threads and closures slowly, without forcing
If your urn has a threaded lid, your goal is not to “tighten it down.” Your goal is to confirm the threads engage cleanly and the lid turns smoothly. Hold the urn body steady and turn the lid gently. If it catches, binds, or tilts, stop. Cross-threading can happen when a lid starts at an angle. Back off, realign, and try again. If it still won’t seat properly, that is exactly the kind of functional issue you want documented early—especially if you’re thinking about a return or a replacement urn.
If your urn uses a press-fit lid, check for even contact all the way around. Uneven gaps can suggest a warped lid or a rim that was knocked in transit. If the urn includes a gasket or seal, inspect it for tears, twists, or dry cracks. Families sometimes search “gasketed urn lid check” because they want reassurance that a seal is intact. A gasket should sit flat, feel flexible, and not be pinched.
For bottom-opening urns, confirm the plate and screws fit correctly
Many urns open from the bottom with a plate secured by screws. It can be a very stable design for home display, because the “opening” is not in the most-handled area. This is also where your bottom opening urn screws check matters. Look for missing screws, stripped heads, or a plate that doesn’t sit flush. Without fully removing anything, you can often confirm alignment by checking that the plate edge is even and the screws appear straight and uniform.
If you are preparing to transfer ashes soon, Funeral.com’s guide How to Transfer Ashes Into an Urn walks through a calm, controlled setup and explains why it’s smart to confirm how the urn opens before you begin.
Engraving and personalization checks: accuracy first, aesthetics second
Personalization is often the moment the urn becomes “real.” That is why it can be so painful to notice a misspelling or wrong date after you’ve emotionally accepted the piece. If you ordered an engraved urn, give yourself permission to do a careful engraving accuracy check. This is not nitpicking. Names and dates are not small details; they are identity and history.
Check spelling, punctuation, capitalization, spacing, and the order of lines. Then check alignment: is text centered as expected, and is it straight? For artwork or symbols, confirm the correct icon was used and the placement matches your proof, if one was provided. If you see an issue, photograph it clearly and immediately, ideally in good lighting with a second photo that shows the full urn for context.
If you are shopping for personalization options, Funeral.com’s engraved choices are collected in the cremation urns for ashes category, and many families find it helpful to choose from a collection first and then confirm engraving details at checkout, rather than trying to decide everything at once.
Measure dimensions now, before a placement surprise later
It’s easy to focus on capacity and forget exterior size. But families often realize late that an urn does not fit the intended niche shelf, cabinet, mantle corner, or columbarium requirement. A quick measure urn dimensions check prevents that last-minute scramble.
Measure height and width at the widest points, and note the footprint of the base. If your plan includes cemetery placement or a niche, confirm the facility’s maximum exterior dimensions. If your plan is home display, measure the shelf depth so the urn can sit securely without hanging over an edge. This is one of those small, boring checks that quietly supports long-term peace of mind—especially if you are also thinking through broader funeral planning questions like timing, memorial gathering plans, or whether the urn will stay at home for a while.
If the urn arrives damaged: what to do next, calmly and practically
When families search urn arrives damaged what to do, they are usually feeling two things at once: sadness and urgency. Here is the simplest truth: damage is fixable in the sense that you can usually receive a replacement or repair solution, but it is easiest to resolve when you keep evidence and slow down.
Start by keeping every piece of packaging. Do not throw away foam supports, box inserts, padding, or labels. If there are loose fragments (for example, ceramic chips), place them in a small bag so they are not lost. Then gather your photos in a single folder. If you need to file shipping claim urn documentation, a clear sequence of images—box, packing method, urn condition—matters far more than a long explanation.
Next, contact the seller with a short message that includes your order number, the date received, and your photos. If the carrier needs to be involved, the seller will typically guide you on whether they file the claim or whether you do. The key is that you have already created the documentation needed for either path.
If you have already received ashes and were hoping to transfer immediately, pause and protect yourself: keep remains in the temporary container until the urn issue is resolved. There is no moral requirement to rush. If you’re worried about what “waiting” means, Funeral.com’s Keeping Cremation Ashes at Home guide offers practical reassurance on safe storage and common questions families carry in this window.
How inspection connects to your bigger plan for ashes
One reason an arrival inspection is so important is that the urn is often a bridge between “the paperwork is done” and “our life is learning how to live with this loss.” When you check closures, hardware, and personalization, you’re not just validating a purchase. You’re making sure the memorial tool you chose fits the plan your family is actually living.
That plan can be simple: many families choose keeping ashes at home in a permanent urn because it provides stability and time. The NFDA statistics page reflects how common this is, noting that among people who would prefer cremation, many report preferences such as keeping cremated remains in an urn at home and scattering in a meaningful place. It’s a reminder that you are not unusual if you want both ongoing closeness and a future ceremony. You are human.
If your plan includes sharing, your inspection should also reflect the reality that more than one memorial item may be involved. Families often pair a main urn with keepsake urns that hold a small portion for siblings or households. If that’s you, the Funeral.com collections for keepsake cremation urns for ashes and small cremation urns can help you match size to intention without turning it into a complicated project.
If your loss is a companion animal, the same practical care applies, but the emotional tone can feel different—sometimes quieter, sometimes sharper, often underestimated by people outside your home. In that situation, inspecting pet urns matters just as much, especially when the urn is sculptural or personalized. You can explore pet cremation urns, including expressive styles like pet figurine cremation urns, and small-sharing options like pet keepsake cremation urns. If you want deeper guidance for sizing and choices, Funeral.com’s Pet Urns for Ashes guide is a helpful, gentle roadmap.
If your plan includes wearable remembrance, an arrival inspection becomes even more “functional.” With cremation jewelry, you are checking closure integrity, threading, and any included gaskets or fill tools—because a tiny seal is the difference between “comfort” and “constant worry.” Start with the cremation jewelry collection or browse specifically for cremation necklaces in the cremation necklaces collection, then read Cremation Jewelry 101 if you want a calm explanation of how jewelry works and how much ashes are typically used. If a piece ever breaks or leaks, Funeral.com also has an emergency guide, If Cremation Jewelry Breaks or Leaks, so you know what “safe next steps” look like without panic.
And if your plan is release rather than keeping—especially water burial or burial at sea—inspection still matters, because the urn type must match the moment. A water-soluble or biodegradable vessel should look and feel different from a permanent metal or wood urn, and the wrong closure can create stress on the day you hoped would feel peaceful. If you’re planning that kind of ceremony, read Water Burial and Burial at Sea: What “3 Nautical Miles” Means so the practical rules do not surprise you later.
A gentle final thought: inspection is not “too practical” for grief
Some families feel almost guilty focusing on screws, seals, and packaging when what they really want is emotional relief. But practical care is often how love shows up in the real world. When you take ten minutes to check threads, confirm a bottom plate fits, or verify engraving accuracy, you are protecting the memorial you chose—and protecting yourself from preventable stress on a day that is already carrying enough.
If you’re still deciding on the larger question of what to do with ashes, Funeral.com’s guide What to Do With Cremation Ashes can help you see options without pressure. And if you’re balancing costs as part of funeral planning, including the question how much does cremation cost, Funeral.com’s practical overview How Much Does Cremation Cost? can give you a calmer starting point for budgeting decisions.
For today, though, you only need one small win: open the box gently, document what you see, and confirm the memorial you chose is sound. That is enough.
Your five-minute urn inspection checklist
- Photograph packaging: box condition, label, packing method, urn-in-box.
- Visual scan: cracks, chips, dents, scratches, uneven base, loose parts.
- Functional checks: check lid threads urn, bottom plate fit, bottom opening urn screws, gasket condition.
- Personalization: engraving accuracy check (spelling, dates, alignment), photograph any issues.
- Fit planning: measure urn dimensions for home placement or niche requirements before discarding packaging.


