


A Guide to Transferring Ashes Into an Urn
Transferring a loved one’s ashes into a cremation urn—just hearing that phrase can make your heart race. But what if I told you this deeply personal act is more manageable than you fear?
Welcome to the Funeral.com podcast. Today, I’m guiding you through every step of transferring ashes—breaking down what happens after the cremation, demystifying the process, and showing how this moment can actually bring comfort and closure. We’ll cover how remains are packaged, how to set up your workspace, step-by-step transfer techniques, tips for different urn styles, and the emotional side of it all.
Ever wondered about 'temporary containers' or why an 'identification tag' matters? Think of a temporary container like a moving box—it keeps things secure on the journey but isn’t meant for display. The ID tag is your assurance, like a luggage tag on a suitcase, ensuring your loved one’s ashes are unmistakably theirs.
Now, maybe you’re thinking, 'Will I have to touch the ashes? What if something goes wrong?' I get it. By the end of this episode, you’ll have concrete techniques, emotional support tips, and the confidence to honor your loved one in a way that feels right for you.
Let’s walk through this together, from first unboxing to final closure, so you can approach this act not with fear, but with love and knowledge.
Understanding How Cremated Remains Are Packaged
Let’s start with what you actually receive from the crematory. In most cases in the United States, your loved one’s ashes come home in a temporary container. That’s usually a sturdy plastic or cardboard box, but the real protection is inside—a sealed plastic bag containing the cremated remains.
You might spot a metal disk or an identification tag attached. Think of this as the serial number on an important document—it’s a critical safeguard to confirm identity throughout the entire process. Don’t remove it, even when transferring the ashes.
Here’s a question I often hear: 'Do I have to open the bag?' The answer is no. If your urn is big enough, you can simply place the sealed bag inside. This approach keeps everything tidy and stress-free.
But what if you want a keepsake for multiple family members, or you need to fill a piece of cremation jewelry? That’s when you’ll carefully open the bag—using a funnel or scoop—to portion the ashes.
So, whether you’re keeping the bag sealed or planning to divide the ashes, understanding this packaging is your first layer of confidence and control.
Setting Up a Calm, Safe Workspace for the Transfer
The environment you choose matters more than you might think. Picture this: You’re standing at a cluttered kitchen counter, pets underfoot, the doorbell rings—stress levels spike. Instead, pick a quiet room where you can work without interruption or rush.
Lay out a towel or newspaper to define your workspace—think of it as your 'workbench,' catching any small spills and making cleanup straightforward. Bring a box of tissues for those emotional moments; this isn’t just a technical task, it’s a ritual.
You don’t need fancy equipment. A household funnel, a pair of scissors, maybe gloves if you’re more comfortable with them—these are your basic tools. If you purchased an urn that comes with its own plastic bag or instructions, take a moment to review them.
Let me ask: Would you feel steadier inviting a friend or family member to help—just to hold the funnel or offer a calming word? Don’t hesitate to ask. Support is a tool, too.
With your space ready and your supplies at hand, you’re not just prepared for the practical steps—you’re making space for memory and care.
Step-by-Step Guide: Transferring Ashes into the Urn
Here’s where the rubber meets the road—or in this case, where the ashes meet their final home. Let’s break it down into small, manageable steps, so nothing feels overwhelming.
First, open your urn. Vase-shaped urns often have a twist-off lid; box urns might need you to unscrew a panel. Think of it like opening a keepsake box—be gentle and deliberate.
Next, gently remove the bag of ashes from the temporary container. If you’re keeping the bag sealed, simply lower it into the urn, folding it carefully if needed. Easy, right?
But what if you’re dividing ashes or filling jewelry? Set up a funnel, cut a small corner of the bag—like frosting a cake for precision—and pour slowly. Pause if you need to catch your breath or feelings. Tap the urn gently to settle the ashes and avoid spills.
Secure the bag with a twist tie or tape, replace the ID tag, and close the urn. If there’s a spill, it’s not a failure—just fold your towel and return the ashes with care. Remember: It’s about honoring, not perfection.
Choosing and Working with Different Urn Styles
Now, let’s talk urn options. Vase-shaped, box-style, keepsake, or jewelry—each has its quirks. Ever tried to fit groceries into a bag that’s just a bit too small? That’s how some urns can feel if you don’t know their design.
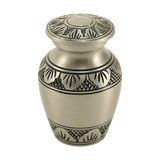
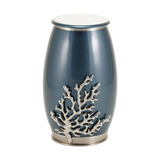
Vase-shaped urns, often made of metal or ceramic, open at the top with a friction-fit or threaded lid. Most families just slip the sealed bag inside, but you can pour directly for a more integrated feel—just know it’s harder to divide later.
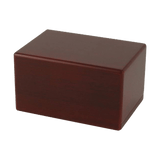
Box-style urns, like the Cherry Woodgrain or MDF models, open from the bottom. These are ideal for sliding in the bag without fuss. The panel screws back on securely, just like closing up a display case.
Keepsake urns or cremation necklaces have tiny openings. Here’s where patience and a miniature funnel are your best friends. You might even use a folded piece of paper, like a scoop, to get those tiny amounts just right.
And remember, you can take your time choosing the urn itself. Whether you prefer a forest scene, elegant metalwork, or a piece of jewelry close to your heart, the right urn is the one that feels like home for your memories.
Closing: Reflecting on the Ritual, Key Takeaways, and What’s Next
Transferring ashes isn’t just a physical task—it’s a moment layered with memory, care, and, yes, emotion. So, what are the three takeaways from today? First: understanding the packaging and ID safeguards gives you peace of mind. Second: creating a calm, organized workspace turns a daunting chore into a meaningful ritual. Third: knowing the right steps for your urn style—whether vase, box, or keepsake—makes the process smooth and respectful.
Here’s one action step: Before you even open the container, set up your work area and gather your supplies. Just that bit of preparation will make everything else easier.
You might still be wondering, 'Will I ever feel ready?' Only you can answer that—but I promise, with the right approach, you’ll get there.
"We appreciate you listening to the Funeral.com Podcast. If today’s episode inspires you to celebrate or remember someone special, explore our selection of memorial services, urns, and keepsakes at Funeral.com. Stay connected with us on Facebook and Instagram for more support and stories."


